In my recent posting about the new Sony large-sensor cameras, I gave fairly short shrift to the new A99 dSLR.
Since that time I've found a YouTube video that gives much more detail about its new features over and above the full size image sensor. There's also a short portion of the video that discusses the Sony NEX-VG900, the large-sensor video camera I discussed in that posting.

Thursday, September 20, 2012
Tuesday, September 18, 2012
CAN WE HOOK UP? (repeated)

[Note: this is another in a series of postings that were originally hosted by Apple but went away when Apple cancelled mobileme.com.]
Our old friend “hook and loop”, better known as Velcro®, is probably familiar to most of you. You usually buy it in matching “male-female” strips with an adhesive backing for attaching pieces of the Velcro® to various items we want to keep together. And you may have seen the commercially-available two-sided straps for lashing coils of cables together.
Our old friend “hook and loop”, better known as Velcro®, is probably familiar to most of you. You usually buy it in matching “male-female” strips with an adhesive backing for attaching pieces of the Velcro® to various items we want to keep together. And you may have seen the commercially-available two-sided straps for lashing coils of cables together.
 I personally use a lot of Velcro®. For years my choice of type was only the original two-strips of sticky-back that is great for holding two objects together. Here are some of my applications for this type.
 The next two pictures on the left show how I mount microphone receivers on my Sony EX1R camera. For most of my shoots I use dual radio frequency transmitter-receivers for my microphones. I have a custom plate that attaches to the camera onto which I’ve applied the patches of sticky-back Velcro® as seen at the right. With the opposite-gender Velcro patches applied to the back of the microphone receivers I can quickly attach them to the camera as shown. Makes for a quick setup and takedown.
 At least two brands of camera bags - Petrol and Kata - have linings that will “couple” with the male form (the “hooks) of Velcro® so that you can attach a patch of it to items you’d like to attach to the lining of the bag so that it won’t rattle around in the bag and can be found easily. The picture at the bottom right show a pen and memory card case being held in place by such an arrangement.
 Finally, a few years ago I discovered a wonderful product at Markertek. They sold a roll of 2-inch wide Velcro® that is hermaphroditic, that is one side is of one gender and the other side the other gender. This means you can make your own loops or straps that can attach to themselves. A roll of this material with a small strap cut from it is shown in the picture at the top of the page. This made it possible to not only custom make straps of virtually any size and strength, it made them readily available when needed.
I keep a couple of lengths stuck to the inside of the camera bag in case I need to hold something in place in the bag.

The picture on the bottom left shows how a small strip can can be used to wrap around cables and such to keep them together.
 I can’t seem find that two-sided Velcro® roll at Markertek now but I’ve found the motherlode of hook and loop - HookandLoop.com. The sell the rolls in widths ranging from 1/2” to 2”. Very convenient! This website even has a page on how Velcro® was invented. Interesting!
The "bottom line" is that Velcro can be used in a variety of useful ways. I always keep a supply of both the stick-on and "hermaphroditic" type close at hand.
Saturday, September 15, 2012
MORE ON POINT & SHOOT CAMERA FILTERS
In a recent posting I described a "homemade" technique for attaching filters to many point and shoot (P&S) digital cameras that don't have a threaded base for attaching normal screw-in filters. In that post I alluded to potential developments being discussed on the web for more professional attachment methods.
So far I've run across three different vendors offering various methods for attaching filters smooth-front point and shoot cameras.
Two of the vendors use an adhesive tape technique for attaching filters or other lens attachments to the camera. The other vendor uses a magnetic attaching technique. In the following paragraphs I'll give my personal evaluation of each technique and what I see as each method's plusses and minuses.
The first vendor (and the earliest in the game as best as I can determine) is Lensmateonline. Their technique is to use adhesive tape to attach a thin base to the front of the lens. This base has a bayonet mount on it. A threaded adapter to hold lenses is then attached to the permanently attached base via the bayonet mount. After that normal screw-in filters can be used. (See image below.)

This vendor is currently selling such a mount for several P&S camera models. The version for the Canon S100/S95/S90 would very similar to that for the Sony RX100. I am told by the vendor that they will be offering a similar mount for the RX100 sometime in September. Price: $32.95 (for the Canon model). Availability: September.
The second vendor using an adhesive tape attachment technique is based in Germany and is selling their unit via eBay. Their technique is based on attaching, via adhesive tape, a base to the lens similar to the technique above.
But their base itself contains the threads for directly attaching a screw-in filter of the desired type as shown in the video below.
This vendor appears to currently offer a setup only for the RX100 but I think it could be applied to other P&S lenses of similar dimension. Price: €25.00 (about $31.20). Availability: Now
The third vendor - Carryspeed (via Amazon) - I've run across uses a base that attaches to the camera front using magnetism. As you can see in the video below, you can quickly mount or dismount the base from the camera.
With this system each filter type comes with its own magnetic base for attachment. Price: $24.95 (for each filter type). Availability: "Real soon now".
MY COMPARATIVE ANALYSIS
Lensmateonline Pro: Lowest profile bayonet base
Uses existing screw-in filters (37 mm for the Canon S100)
Filters can be stacked
Con: Adhesive tape mounting
Two piece base
Small filter size (37 mm) may lead to vignetting when stacked
eBay vendor Pro: One-piece base
Uses existing screw-in filters (46 mm)
Filters can be stacked (chance for vignetting should be minimal)
Con: Adhesive tape mounting (said to be easily removable)
Higher installed profile
Larger filter size (46 mm)
Carryspeed Pro: Easy on/off attachment
No permanent base required
Two sizes available for different camera models
Con: Cannot use existing screw-in filters
Only polarizer announced so far
Cannot stack filter types
Must buy proprietary filters with attached base
SUMMARY
I really like the Amazon magnetic attachment method. It's self-centering and easy to add or remove. HOWEVAH, I don't like the fact that I have to purchase their filters to use it. I have a ton of conventional screw-in filters of many different sizes and types that I would like to use instead of purchasing more from them. I actually left a comment on their blog indicating the desirability of separating the magnetic base from the filters.
The Lensmateonline version's big advantage is the low profile of the base when attached so that it shouldn't interfere with using it in a tightly fitting camera case. My worry about this system (without any hands-on experience) is that stacking filters - say an ND and a polarizer - may lead to vignetting.
So...that leaves the eBay version. Although the more or less permanently attached base is a little higher than the Lensmateonline unit, it uses 46 mm filters which should minimize vignetting problems. I also have a set of 46 mm filters that I normally carry with me on shoots for use with another of my cameras. Therefore, I have decided to order one of these attachments to try with my RX100. I'll report on it after I've had a chance to try it.
All of the above products will work well, I believe. Each person will need to analyze the features of each approach to determine which best meets their requirements. I think that there's enough different sizes available to fit a large variety of P&S cameras.
If anyone decides to try either of the other two types of add-ons on their P&S I'd like to hear about your opinion of them.
Wednesday, September 12, 2012
STAND BACK! I DON'T KNOW HOW BIG THIS IS GOING TO GET
Sony is on a roll. They keep putting bigger sensors in smaller devices. They have just announced three new cameras using "full-size" (35 mm) sensors. While one of the cameras is a "classic" dSLR, many of which have had full-size sensors, the other two cameras are astonishingly small for using such a large sensor.
To get an idea of comparative sensor sizes the graphic below compares the size of sensors in three different still cameras. (Courtesy cameraimagesensor.com)

The sensor on the left is the one in the very popular Sony DSC-HX10. The one in the middle is the one in the recently released Sony DSC-RX100 which I have and love. It's 20 MP sensor was considered huge for a pocketable point and shoot camera. Finally, the sensor size on the right is the size used in the three new cameras, two of which I consider amazing for being able to use such a large sensor.
First of all, the new video camera, the NEX-VG900, is hardly larger than many of Sony's "handy cams". Just look at the image below. The overall size of of the system is dominated by the interchangeable lens.

Note how small the camera body is compared to the hand holding in the image on the right. I'm just amazed that Sony was able to pack such a large sensor in such a small package. Having such a large sensor provides a large film camera-like depth of field. It uses the same E-mount lenses used on many other Sony cameras. I haven't seen any pricing data on this camcorder yet. Not sure when it will be available.
The new Sony dSLR is the Alpha SLT-99, priced at about $2800 for the camera body only. Here's a picture of the new dSLR.

It looks pretty conventional to me but for dSLR users I'm sure it will have some great new features. The fact that Sony was able to use the large sensor in a dSLR is not shocking since many such cameras use large sensors. Therefore, I'm not going to waste space here discussing it.
The third camera is the Sony Cyber-shot DSC-RX1. The overall size of the RX1 body appears to be hardly larger than the RX100 but it has significant changes from the RX100:


To get an idea of comparative sensor sizes the graphic below compares the size of sensors in three different still cameras. (Courtesy cameraimagesensor.com)
The sensor on the left is the one in the very popular Sony DSC-HX10. The one in the middle is the one in the recently released Sony DSC-RX100 which I have and love. It's 20 MP sensor was considered huge for a pocketable point and shoot camera. Finally, the sensor size on the right is the size used in the three new cameras, two of which I consider amazing for being able to use such a large sensor.
First of all, the new video camera, the NEX-VG900, is hardly larger than many of Sony's "handy cams". Just look at the image below. The overall size of of the system is dominated by the interchangeable lens.
Note how small the camera body is compared to the hand holding in the image on the right. I'm just amazed that Sony was able to pack such a large sensor in such a small package. Having such a large sensor provides a large film camera-like depth of field. It uses the same E-mount lenses used on many other Sony cameras. I haven't seen any pricing data on this camcorder yet. Not sure when it will be available.
The new Sony dSLR is the Alpha SLT-99, priced at about $2800 for the camera body only. Here's a picture of the new dSLR.

It looks pretty conventional to me but for dSLR users I'm sure it will have some great new features. The fact that Sony was able to use the large sensor in a dSLR is not shocking since many such cameras use large sensors. Therefore, I'm not going to waste space here discussing it.
The third camera is the Sony Cyber-shot DSC-RX1. The overall size of the RX1 body appears to be hardly larger than the RX100 but it has significant changes from the RX100:
- A full-frame (35 mm) 24 MP CMOS sensor
- A fixed focal length 35 mm-f/2 non-interchangeable lens
- An accessory shoe for attaching optional optical or electronic viewfinders
- 24P (in addition to other frame rates) video
- A much higher price - about $2800
Here's a top view of the two cameras. The non-zooming, non-removeable 35mm/f2.0 lens is almost bigger than the camera body itself.
Just to show how much small this camera is than other full-frame sensor cameras here are some comparisons with the Leica M9 and Canon 5D Mark III (without a lens).
At a $2800 price the RX1 is obviously not a camera that all of us will run out and purchase but for the pro "street photographer" this camera may be the "killer app". It's really top notch full frame camera that a pro can have with them in virtually all situations.
Apparently Sony felt that adding an interchangeable lens mount would have made the camera to large. Using the multiple exposure overlay technique of the Sony HX10 and RX100, Sony is claiming an upper end ISO rating of 102,400!
Expected availability for the RX1 is November.
SUMMARY
Sony seems to be on vendetta to show just how small they can make cameras with huge sensors if the VG900 and RX1 are any indication. I'll have more to say about the cameras as more information comes out.
Monday, September 10, 2012
MINE'S BIGGER THAN YOURS

The rapid march of digital camera technology continues apace. It is hard to stay up with the latest developments.
I have found some websites that can be of great help when shopping for a new camera. These websites together enables one to:
- Compare the physical size of cameras graphically
- Compare the physical size of their image sensors graphically
- See extensive comparative test images side-by-side
- Compare test results of selected cameras side-by-side
PHYSICAL SIZE
The site camera size.com enables one to see scaled images of two cameras side-by-side. Here's an example of their comparison:

The neat thing about this comparison site is that you can get a variety of views of the cameras - front, side, back, or overlaid. You can also have a AA battery in the comparison image for size comparison. Here's one of the views of the cameras from overhead with the AA battery included:

The site has an extensive database of cameras that can be compared. A few don't have all views available but most do. A very useful site for quickly comparing camera sizes.
SENSOR SIZE
The site cameraimagesensor.com is a companion to the preceding site. You can get an idea of the comparative sensor sizes, either side-by-side (as below) or overlaid.

With the large variety of sensor sizes available today ("micro 4/3rds", "APS-C", etc), this site can be quite useful in understanding the various sizes.
COMPARATIVE IMAGING RESULTS
The site imaging-resource.com provides in-depth reviews of cameras along with extensive test images taken under identical conditions. One can compare camera results in a variety of subject and light conditions that are the same test-to-test. The comparo below is just one of many test images available for each camera.

The test images can be enlarged to see precise detail in the images.
QUANTITATIVE PERFORMANCE COMPARISON
Finally, dxomark.com provides quantitative sensor results for several sensor parameters along with a consolidated overall score. This particular site has a ton of data on both camera and lens performance. An example of their fundamental comparisons is shown below.

SUMMARY
Taken together the preceding websites provide a wealth of information for evaluating and comparing cameras. With most of us doing our purchases on the internet rather than in "brick and mortar" stores makes it harder to get a good feel for how different cameras compare. The preceding sites can make the selection process easier.
Saturday, September 8, 2012
SUCK IT UP (updated)

[Note: this is another in a series of postings that were originally hosted by Apple but went away when Apple cancelled mobileme.com. It has been updated from the original posting.]
Sometimes you need to mount a cameras or accessories in unusual places. If the right smooth surface is available one versatile method of mounting is a suction cup. I've used them to mount a camera on the side of a refrigerator, windows, and the the hood of an automobile.
Suction cups come in a variety of sizes and with a variety of available mechanisms for camera mounting in variety of positions. Or, they can be used for mounting lights or other accessories if a smooth surface is available.
The photo below shows some of the varieties of suction cup mounts available. The one on the left is essentially a bare suction cup with just a threaded stud on it to which a variety of accessories can be attached. The suction cups come in a variety of sizes from about three to 10 inches, depending on the load carrying capability needed.
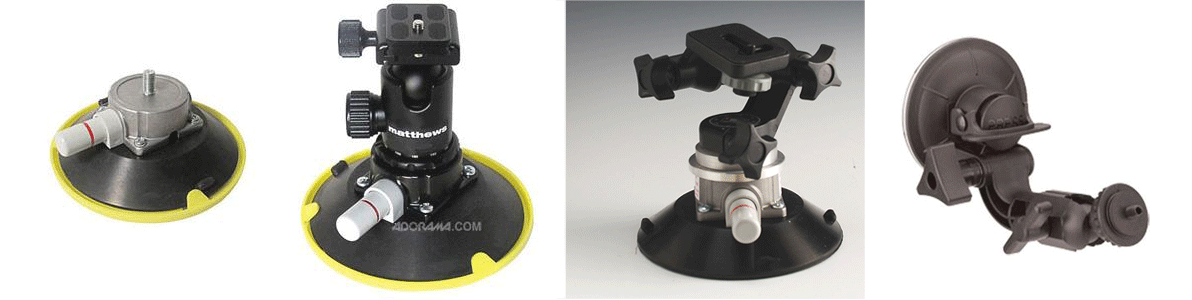
The last mount in the image above is one that I use frequently. The suction cup is only about three inches in diameter so it is only useful for smaller cameras such as the Sony RX100 digital camera or Sony MC50 video camera. The mount has a moveable arm for positioning the camera. It's great for mounting a camera on the window or windshield of an automobile or to the window of a building. I always have one of these in my travel kit.
I also have one of the units that is second from the right above. It has a 4.5 inch suction cup and is suitable for heavier cameras or other equipment. The photo below shows how I used this model to mount my Sony HVR-Z1U to the windshield of the ClamCam Videomobile.

I my suction cup mounts frequently. I have found them very useful in many situation.
Thursday, September 6, 2012
CALIFORNIA DREAMING...er, NIGHTMARE

Another advantage of Amazon has been the fact that purchases from them were not subject to your state's sales tax. The first chink in that advantage is about to happen.
As of September 15th, Amazon sales in California will be subject to California sales tax. Bummer! Even though I don't live in California I see this as the first of many states in which Amazon will start collecting local state tax on their sales.
I have read reports that Amazon is actually supporting these sales tax actions because they are building distribution centers in more and more states to be able to actually provide one-day delivery for their Amazon Prime customers.
I would actually prefer two-day delivery to paying sales tax on my purchases.
Historically, internet merchants (like me, for example) only had to collect state sales taxes from customers from states in which they actually had a physical presence. Unfortunately, as internet merchandising has become so large, states are beginning to lobby for that to change.
On the near-term (as best as I can determine), California is the only state, so far, in which Amazon is collecting state sales taxes but others will undoubtedly follow.
So...if you live in California and have been anticipating some Amazon purchases, now is the time to do them, at least before September 15th.
And if you use one of the Amazon links on this page I will receive a small consideration. 8-)
Tuesday, September 4, 2012
SOMETHING WEIRD

While on travel this past weekend I had something totally weird and unexpected happen with my Sony DSC-RX100. I thought I'd pass the incident along in case you run into a similar situation.
I had been using the camera frequently during the day but had put it aside for a couple of hours while attending to something else. When I started it up everything looked normal but when I tried to take a photo by pressing the shutter release button, basically nothing happened. No focus bars and no photo being taken. I tried switching photo modes with basically the same result. After some tries a photo was finally taken but it was while I was moving the camera around, not when I was actually trying to take a photo.
I switched to the video mode and it seemed to respond correctly in that mode to video commands.
I switched back to the photo modes with the same non-picture-taking result.
It wasn't convenient to troubleshoot the camera in the situation at hand so I put the camera away until I was back in the hotel room.
I first tried something that I'd seen on YouTube soon after the RX100 was released. This person had his RX100 lockup. When he took it back to his dealer he was told to remove the battery for awhile. He did and it solved his problem. Unfortunately, removing and replacing the battery didn't fix my problem.
So...I looked in the RX100 Cybershot User Guide. I did a search on "reset" and although I found that the camera doesn't have a reset button like many Sony cameras have, it did have a three levels of initializing user settings. "Custom reset" resets only custom settings; "Rec mode reset" resets only major shooting settings to the default values; and "Reset Default" which resets a settings to default settings.
I tried the first level - Custom reset - first without success. I then decided to go all the way with the Reset Default level. This level apparently not only resets manually input settings to their default values, it actually reloads the camera's firmware. Whatever it does fixed my problem - yippee!
I guess the lesson here is that as our cameras get more complex and more controlled by software than hardware, they may occasionally have the problems that our computers have. Thankfully, the reset I did worked.
If you've anything similar to this I'd like to hear about it.
Subscribe to:
Posts (Atom)